
No products in the cart.
Herelink Setup Guide: Wiring, Pairing, Calibration and Air Unit to Air Unit Mode
By the AT Group OÜ engineering team · Last updated: 12 November 2026
To set up Herelink, connect the air unit’s S.Bus port to the autopilot’s RCIN and its UART to TELEM1 or TELEM2, power it from about 7 V, and plug the camera into HDMI 1. Then pair the controller from Herelink Settings, select your region, and complete the three first-use calibrations: wheel, joysticks and SBUS output.
This guide follows CubePilot’s official Herelink manual and links each step to its source.
Key facts at a glance
- Herelink combines RC control, HD video and telemetry in one link, and works with Cube autopilots, ArduPilot and PX4. [1]
- Range is 12 km under CE rules (Europe) and 20 km under FCC rules. [1]
- Video latency is 110 ms, at up to 1080p at 30 or 60 fps, on the 2.4 GHz band. [1]
- The link is encrypted with AES-128-CTR. [8]
- Herelink 1.1 adds Ethernet on the air unit and a 1000-nit controller screen (600 nit on 1.0). [1]
What is in a Herelink system?

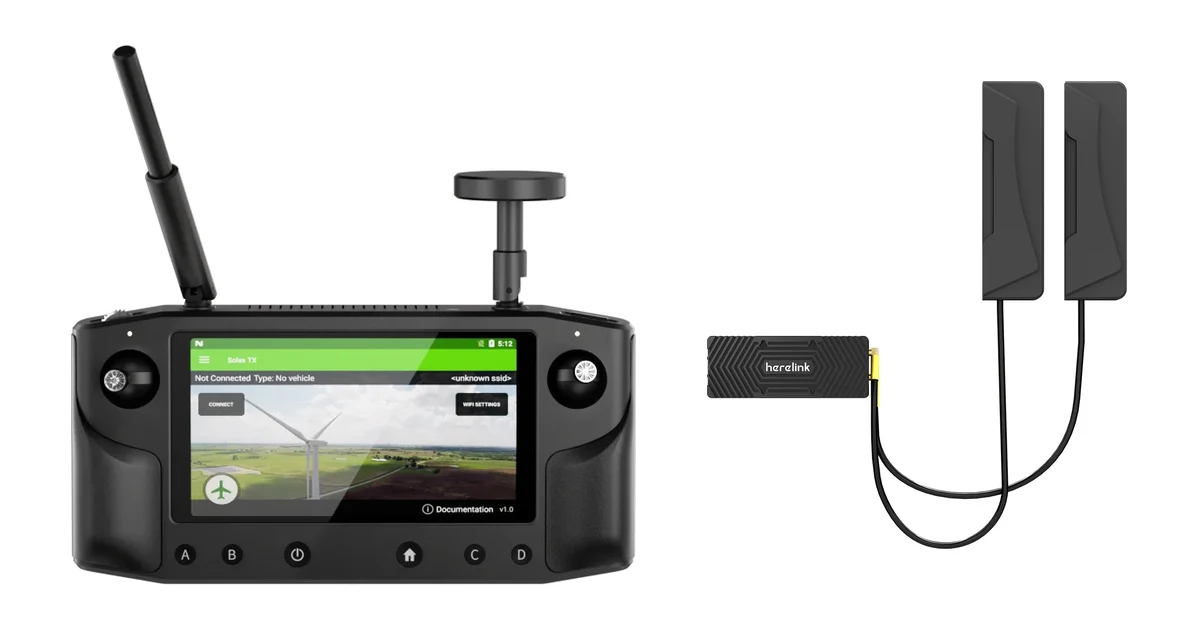
A Herelink system is a handheld controller plus an air unit that goes on the aircraft. [1]
| Controller | Air unit | |
|---|---|---|
| Size | 217 × 106.5 × 31 mm | 78.5 × 30 × 15 mm |
| Weight | 516 g (1.0), 536 g (1.1) | 95 g (1.0), 98 g (1.1), with antennas |
| Memory / storage | 2 GB / 8 GB | 1 GB / 4 GB |
| Interfaces | 5.46″ 1080p touch screen, micro-USB, micro-SD up to 64 GB | 2 × micro-HDMI, 3.3 V UART, 2 × S.Bus out, micro-USB; Ethernet on 1.1 |
| Antennas | 5 dBi directional + 2 dBi omni, detachable | 2 × MMCX |
| Power | Built-in 4950 mAh LiPo, 5 V 2 A charging | External, about 7 V (see below) |
Source: CubePilot Herelink overview. [1] The controller ships with Solex TX and QGroundControl. [1]
How do you wire the Herelink air unit to the autopilot?

Three cables do the job: S.Bus for control, UART for telemetry, HDMI for video. [2]
- S.Bus → RCIN. Connect the air unit’s S.Bus port to the autopilot’s RCIN. S.Bus 1 carries the control channels; S.Bus 2 is intended for the gimbal. [1][2]
- UART → TELEM1 or TELEM2. Connect the air unit’s 3.3 V UART to TELEM1 or TELEM2 on the autopilot. [2]
- Camera → HDMI 1. CubePilot recommends HDMI 1. A second camera goes to HDMI 2, and you switch between the two streams on the controller. [2]
- Power. CubePilot recommends a supply of about 7 V, supports a 3S LiPo, and advises not to share a BEC with the servos. [1]
The CubePilot documents give slightly different input ranges (6–12 V on the overview, up to 12.6 V on the pinout and assembly pages). Stay close to 7 V to be safe. [1][2]
Antenna placement matters for range. Mount the air unit antennas vertically at about 15°, away from metal and other conductive parts. CubePilot reminds users that carbon fibre is conductive. [2]
With Herelink 1.1 you can use Ethernet instead of the UART. ArduPilot documents an Ethernet virtual serial connection; the air unit’s IP address is 192.168.144.10 and the ground unit’s is 192.168.144.11. [10]
Warning: do not connect a SIYI camera directly to the Herelink Ethernet port. CubePilot’s service bulletin SB_0000007 requires magnetics or capacitors for isolation, or a switch or hub in line. [9]
Keep the air unit cool

Herelink 1.1 includes a cooling fan. It mounts on top of the air unit with four M1.6 screws and runs from a 5–12 V supply. [1][2]
How do you pair the controller and the air unit?
Pair from Herelink Settings, then hold the air unit’s button until LED2 blinks. [3]
- On the controller, swipe down the notification drawer from the App Launcher screen.
- Open Herelink Settings and press Pair.
- Hold the Pair/Reset button on the air unit until LED2 blinks green.
When the link is up, LED2 turns solid green. Solid yellow means unpaired or no signal, and blinking red means unstable power. [1]
Region and frequency settings
Select your region first: in Europe, choose CE. You set it under Herelink Settings → Country. [3]
On the Frequency page you can set the downlink and uplink bandwidth. CubePilot suggests 20 MHz for long-distance control and 1.4 MHz where there is heavy interference, and recommends enabling frequency hopping so the system selects the best channel. [3]
Do not switch the controller to airplane mode in flight: airplane mode disconnects the air unit. [8]
How do you calibrate the Herelink controller?

First use needs three calibrations: the wheel, the joysticks and the SBUS output. [4] All three are in the notification drawer under HW JS CAL.
- HW WHEEL CAL: press Start rollwheel and follow the steps, then press Pass.
- HW JS CAL: press Start Calibration and move the sticks as the arrows show. Press Pass to store it, or Fail to repeat with more pressure in the corners.
- SBUS OUT CAL: move the sticks through each position, then the wheel.
When the Calibrated indicator turns green, the controller is ready. [4] Remember to press SAVE after any change to the controller settings. [4]
Useful settings on the same page: [4]
- Mode selects the RC transmitter mode.
- CH# maps outputs: SBUS1 carries channels 1–16, SBUS2 channels 17–32.
- Dual Cont lets two controllers operate one air unit, for example as a trainer setup.
How do you update Herelink firmware?
Use the CubePilot flasher on a PC, or update over Wi-Fi once the controller can see the air unit. [5]
- PC update: download the flasher for Windows, macOS or Linux from CubePilot. Put the controller into Fastboot mode by holding Power + D while switching it on. [5]
- Over the air: if the controller shows the air unit’s firmware version, you can update both through the settings app over Wi-Fi. [5]
- Activation key: on later units the key is on the back of the controller. [5]
How do you connect Herelink to Mission Planner?
Over the Herelink hotspot, use UDP on port 14550; on a shared network, use UDPCL with the controller’s IP and port 14552. [6]
- Herelink Wi-Fi hotspot: in Mission Planner, select UDP, press Connect, and enter port 14550.
- Same Wi-Fi network, USB tether or Ethernet: select UDPCL, enter the controller’s IP address and port 14552.
- Live video: needs Mission Planner 1.3.70 or later. Start the stream in Solex or QGroundControl first, then right-click the HUD → Video → Herelink Video.
How does Air Unit to Air Unit mode work?
Two air units can form a link without the controller: one stays on the aircraft, the other becomes a ground unit for a PC. [7] This is the setup behind the searches for “Herelink air unit to air unit”.
What you need: two air units with firmware 20211229 or newer, and a USB Ethernet adapter on the ground side. CubePilot recommends a fan on both units. [7]
- Update both units first, with both internal switches down (the default air unit position). [7]
- Turn one unit into the ground unit. Power it off, open the case and set the switches. On AirUnit 1.0: switch 1 up, switch 2 down. On AirUnit 1.1 (with Ethernet): switch 1 down, switch 2 up. [7]
- Pair. Hold the pairing button for 3 seconds on both units within 30 seconds. The LED turns solid green. [7]
- Set up the PC. Turn off Wi-Fi and give the Ethernet adapter the static IP 192.168.144.3. [7]
- Get video. Open
rtsp://192.168.144.10:8554/H264Videoin VLC, Mission Planner or QGroundControl. [7] - Get MAVLink. In Mission Planner select UDPCL, IP 192.168.144.11, port 14552. [7]
Only one HDMI input carries video between the two units in this mode. [7]
Frequently asked questions
What is the range of Herelink in Europe?
12 km under CE rules. CubePilot specifies 20 km under FCC rules and 12 km under CE, SRRC and MIC rules. [1]
What is the video latency of Herelink?
CubePilot specifies 110 ms, at 720p30 or 1080p at 30 or 60 fps. [1]
Is the Herelink link encrypted?
Yes. Herelink encrypts over the air with AES-128-CTR. [8]
What is the difference between Herelink 1.0 and 1.1?
Herelink 1.1 has a brighter controller screen (1000 nit instead of 600 nit), an Ethernet port and an SD slot on the air unit, and a cooling fan in the box. [1]
Does Herelink work with ArduPilot and PX4?
Yes. CubePilot designed Herelink for Cube autopilots running ArduPilot or PX4, and ArduPilot documents it as a supported RC and HD video system. [1][10]
Is Herelink covered by CubePilot’s NDAA statement?
No. CubePilot states that Herelink is assembled in China and is the one product its NDAA statement does not cover. [11]
Herelink in Europe
AT Group OÜ is an official CubePilot distributor in Europe. We supply the Herelink Air Unit v1.1 and the Herelink Controller Unit v1.1, together with the Cube autopilots they connect to. For choosing the autopilot, see our CubePilot autopilot comparison.
Request a quote → for complete Herelink + Cube kits or volume pricing.
Sources
- CubePilot — Herelink Overview: https://docs.cubepilot.org/herelink/herelink-overview
- CubePilot — Assembly and Connection: https://docs.cubepilot.org/herelink/herelink-user-guides/assembly-and-connection
- CubePilot — Wireless Communication: https://docs.cubepilot.org/herelink/herelink-user-guides/wireless-communication
- CubePilot — Pairing, RC Calibration & Setup: https://docs.cubepilot.org/herelink/herelink-user-guides/one-time-setup
- CubePilot — How To Update Firmware: https://docs.cubepilot.org/herelink/herelink-user-guides/upgrading-firmware
- CubePilot — Connecting to Mission Planner: https://docs.cubepilot.org/herelink/herelink-user-guides/connect-to-mission-planner
- CubePilot — Herelink 1.0 AirUnit to AirUnit instruction: https://docs.cubepilot.org/herelink/herelink-user-guides/herelink-1.0-airunit-to-airunit-instruction
- CubePilot — Herelink FAQ: https://docs.cubepilot.org/herelink/herelink-faq
- CubePilot — SB_0000007 Ethernet on Herelink and a SIYI camera: https://docs.cubepilot.org/service-bulletins-and-critical-notices/safety-service-bulletins/sb_0000007-ethernet-on-herelink-one-a-siyi-camera
- ArduPilot — Herelink RC/HD Video Transmission System: https://ardupilot.org/copter/docs/common-herelink.html
- CubePilot — US Defence: https://docs.cubepilot.org/us-defence